Drafting a bishop sleeved blouse with a split hem.
Each season, I make a list of projects I’d like to accomplish. Inevitably, there are items that roll over into next season (or next year). Designing a blouse keeps emerging list after list, perpetually shuffled over to the next one.

I designed a boxy blouse in spring 2018 – the Xena blouse. I liked the style lines, but the fit of that blouse is too boxy for my taste and I don’t wear it often. I’d like to revisit that design with a better fit via contouring.
So “design a blouse” remained on my list. The vision I had for it was hazy; I hardly had any ideas about what it should be.
Before Christmas, I was working on designing a long-sleeve shirt pattern that could be cut from 2 yards of fabric because most of my stash fabrics are 2 yards each. The shirt block I made a couple years ago is too wide to work, so I was researching the best way to rotate the waist dart to the bust.

I’ve also had my eye on some bishop sleeves since making the Willow cardigan.
Cut to frantic Christmas present making and post-holiday recovery with a good book…a design textbook!!!
It’s called Pattern Making for Fashion Design. Yinz guys…I’m SO TERRIBLY EXCITED about this book! It has everything – real instructions for real drafting, terms for design features I didn’t know, example problems and sloper drafting tutorials including men’s and knits!
The soft-back version is 1/2 the price of the hardcover, with the main difference being no color illustrations, so that was a no-brainer.
It looks like a geometry book. There’s so much math and it’s super technical. At times the directions can be hard to follow but I’ve managed so far!
I’ve spent hours pouring over the pages, flipping through the multitude of ideas I’ve tried and failed to research online. Like, did you know there are fashion flanges? Flanges! I deal with those at work, but they’re galvanized steel. I love the look of a fashion flange, but good luck researching that without the proper terminology!
There are so many places to start with this knowledge at my fingertips I had to make another list! I looked back through my last couple of project lists for ideas, remembering my wild notion of a 2 yard long-sleeve shirt. So I started there.
The first step was making a torso sloper from my existing bodice. When I did this on my own over a year ago, I was wandering lost in a misty forest. I had no idea what to do or how, making seemingly arbitrary changes and endless muslins. It took well over a month, and I was frazzled afterward. The final product, of which I was supremely proud, had definite fit issues that I chose to ignore.
But now I have Knowledge! And Power!
The instructions for a torso sloper were quite involved and took a direction I never would have concocted on my own. A brief overview is that you move the waist dart to the shoulder, transfer some of the dart intake via the side seam, add the double-ended darts using set measurements, then transfer the shoulder dart to the bust. Voila!


This process took me 3 hours, including sewing up a muslin. It fit the first try and it fit better than anything I drafted before (besides my bodice sloper which fits due to blood, sweat and tears). The sloper has 2 double-ended waist darts in the front and back. Sewing both darts creates a skin-tight sloper, and you can eliminate one or all of the darts to change the fit.
For this design, I eliminated all the darts so I could pull the shirt on over my head. I added 1″ wearing ease at the hip, because the sloper was super fitted in that area. I smoothed out the side seam curve which was pretty dramatic, adding ease in the process.
I’ve also had front plackets on my mind, so I tried one of those as well. I went with a winged placket collar, which looked really cool in the textbook illustration. It wasn’t difficult to draft but I did a little head scratching with sewing it up. The book doesn’t cover how to sew the things you design so I have to rely on my own experience for that. Sewing this placket was similar to inserting a front yoke.
Long story short, I sewed up the winged placket collar (admittedly doing a sloppy job). It was somehow too 70’s and too 1700’s simultaneously. The 1700’s vibe could be from the undyed muslin, but either way I decided to scrap it in favor of a simple v-neck.


The last, most important component for this blouse was the bishop sleeve. Again, I followed along with my book. It was an easy slash-and-spread method, to which I added extra width and length for blousing, using elastic to gather the cuffs.
The muslin was a bit tight across my back and under my arms when I outstretched or crossed them, so I added a back yoke facilitating a little 1/2″ pleat at the center back and I dropped the armscye by 1/4″. These adjustments made the blouse comfier and gave me a better range of movement.

I made the back 3″ longer than the front. The split hem is a simple narrow double-folded hem with a securing zig-zag stitch above the split itself.

The pattern fits on 2 yards!! It’s a tight squeeze with 45″ wide fabric but it works! Victory!
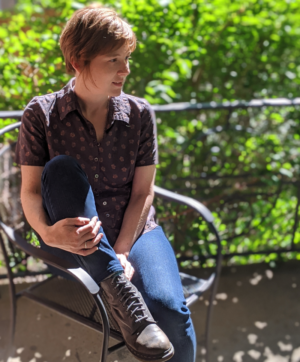
So here’s my bishop blouse with a split hem. I’m calling it the Garnet blouse because it reminds me of Garnet til Alexandros, (a video game princess) from Final Fantasy 9. I loved it so much I made two!
The first fabric I used is really cool and has been in my stash for a long time! It’s embroidered with little crosses/checks. I was very careful not to snag them while working. Some of the threads on the wrong side were loose after cutting the fabric, and I back-stitched over those while sewing the seams to secure them. There are french seams throughout.


The second fabric I used is triple gauze. Its ultra floaty and soft. There are literally three layers of gauze stitched together with tiny, singular gauze threads.
It was surprisingly easy to sew, not shifting or slipping like I expected. It does show everything however – every seam, the darts especially, are quite obvious in this fabric. It’s a little hard to photograph well!


I separated one sheet of gauze from a scrap to make bias tape for the side seams. This was really tedious, so I used french seams for the armscye instead!
This blouse is an outfit all its own. Because of the sleeves, which are the star of the design, I don’t wear anything over it and mostly I’ve been wearing it with pants. But in warmer weather, I think it’ll work well tucked into a skirt. Both of these fabrics are weighty and warm! I’d like to try it in a lighter fabric for spring.
I’m super excited to continue designing for myself, armed with the knowledge in my tome. My goals for this year are to continue learning to draft, make more complex designs, and challenge my skills by making some slopers for other people.
I think my next design project will be a better button-up shirt as I have the perfect fabric for it and it will use my new torso sloper!
Thanks for reading <3